ScaleIO Framework Demo
If you are looking for a demo or a quick and easy dev/test environment, this might be for you!
Configuration
The requirements of having a 3-Node ScaleIO cluster along with an Apache Mesos Master and Agent cluster would heavily resource constrain a laptop or computer used for local development. An AWS CloudFormation template is provided that deploys and installs a fully configured Dell EMC ScaleIO and Apache Mesos cluster on Amazon AWS. This template currently works in the US-West-1 (aka N.California) region only.
NOTE: Deploying this template uses six (6) t2.medium instances in the N.California
region, costing $0.068/hour. The AWS EC2 compute usage for this cluster will
cost approximately $9.78/day. The template provisions nine (9) EBS volumes in
total. Six (6) for the operating systems and three (3) 100-gigabyte volumes for
ScaleIO storage.
Steps: 1. Deploy The CloudFormation Template 2. Verify ScaleIO Configuration 3. Launch Framework 4. Deploy Applications
Watch the YouTube Demo Video to see it in action.
Deploy CloudFormation Template
The password for administrator rights is F00barbaz. Both the ScaleIO and Mesos
nodes are deployed using Redhat 7.X instances. The usernames used to log into
any those systems via ssh are ec2-user.
Within the AWS Web GUI:
- Verify you are in the N. California region.
- Within the drop-down of
ServiceschooseCloudFormation - Click
Create Stack, thenChoose a Template - Click
Upload file to S3, and upload Framework_Testing_Cluster_RHEL7.json - Give the stack a unique name (such as: MesosFrameworkDemo)
- Select a keypair that exists in the N.California region
- Click
next. Tags are optional. Clicknext - Review the settings and click
Createto create the stack
The stack will take approximately two minutes to build and the nodes will be available for ssh login.
Verify ScaleIO Configuration
It is important to determine the Master, Slave and TieBreaker MDM (Metadata Manager) nodes, as this information is needed to launch the framework. Through multiple testing scenarios, ScaleIONode2 (with the Private IP address of 10.0.0.12) is typically the Primary MDM node. SSH into that instance using the Public DNS or IP
ssh -i "keypair.pem" ec2-user@ScaleIONode2-IP-or-DNS
Run the following commands:
-
Log into the ScaleIO shell:
scli --login --username admin --password F00barbaz -
Verify the MDM nodes:
scli --query_cluster
Sample output will look like this:
Cluster:
    Mode: 3_node, State: Normal, Active: 3/3, Replicas: 2/2
Master MDM:
    Name: Manager2, ID: 0x1ed68652078a0ab1
        IPs: 10.0.0.12, Management IPs: 10.0.0.12, Port: 9011
        Version: 2.0.5014
Slave MDMs:
    Name: Manager1, ID: 0x44691e69695396d0
        IPs: 10.0.0.11, Management IPs: 10.0.0.11, Port: 9011
        Status: Normal, Version: 2.0.5014
Tie-Breakers:
    Name: Tie-Breaker1, ID: 0x569bc3812558b2d2
        IPs: 10.0.0.13, Port: 9011
        Status: Normal, Version: 2.0.5014
Launch Framework
Before launching, open the Marathon UI at:
http://[MESOS MASTER PUBLIC DNS/IP ADDRESS]:8080
Utilize scaleio.json to correctly match and/or update the internal IP addresses of the Master, Slave, and TieBreaker MDM nodes. Typically, but not always, the defaults are the correct values:
{
  "id": "scaleio-scheduler",
  "uris": [
    "https://github.com/codedellemc/scaleio-framework/releases/download/v0.3.1/scaleio-scheduler",
    "https://github.com/codedellemc/scaleio-framework/releases/download/v0.3.1/scaleio-executor"
  ],
  "cmd": "chmod u+x scaleio-scheduler && ./scaleio-scheduler -loglevel=debug -rest.port=$PORT -uri=10.0.0.21:5050 -scaleio.clusterid=6f831c6866417634 -scaleio.password=F00barbaz -scaleio.preconfig.primary=10.0.0.12 -scaleio.preconfig.secondary=10.0.0.11 -scaleio.preconfig.tiebreaker=10.0.0.13 -scaleio.preconfig.gateway=10.0.0.11",
  "mem": 32,
  "cpus": 0.2,
  "instances": 1,
  "constraints": [
    ["hostname", "UNIQUE"]
  ]
}
After verifying the values are correct in the JSON file, cURL the JSON to Marathon by running the following command:
curl -k -XPOST -d @scaleio.json -H "Content-Type: application/json" [MESOS MASTER PUBLIC DNS/IP ADDRESS]:8080/v2/apps
View the status of the ScaleIO framework by opening the Deployment UI.
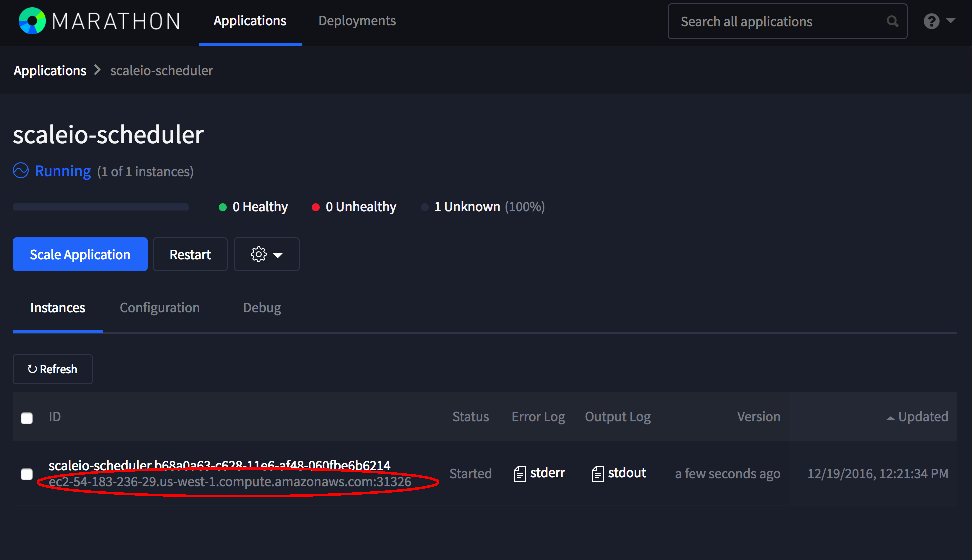
- Within the Marathon UI at
http://[MESOS MASTER PUBLIC DNS/IP ADDRESS]:8080, Click thescaleio-scheduler. - Underneath the scheduler's ID, click the link (circled in red below) to open up a simple installation status page contained within the scheduler.
- A list Mesos Agent nodes with the current status of ScaleIO deployment can be seen and the page will automatically refresh itself.

The Agent Nodes WILL REBOOT after successful installation. This is done within this demo ONLY to make sure ScaleIO, Docker, REX-Ray and Marathon services are functioning properly. This process can take 2-5 minutes.
The status of ScaleIO deployment web portal will be restarted on the other Mesos Agent with a new port.
Deploy Applications
This particular setup has a 5 minute timeout. If a Docker image takes longer
than 5 minutes to download, then deployment will fail. It's suggested to go to
each Mesos Agent and download the image using docker pull if there is a poor
connection.
$ ssh -i "keypair.pem" ubuntu@MesosAgent1_IP_or_DNS
$ docker pull <image name>
Deploying Applications: